| Contact |
| Back | Home |
Restoration of the Marconi Multiple Tuner
|
I am a bit of a purist when it comes to radio restoration so normally I will do little more than give a piece a good cleaning. If brass is corroded I will clean it, but I avoid polishing to a high gloss because I believe it reduces the character and value of the piece. In the case of the multiple tuner, however, I chose to do a full restoration because this is a very rare and unique piece and deserves to be seen as it was when it was new; a very high quality scientific instrument and a large step forward in the technology of wireless communication. |
|
|
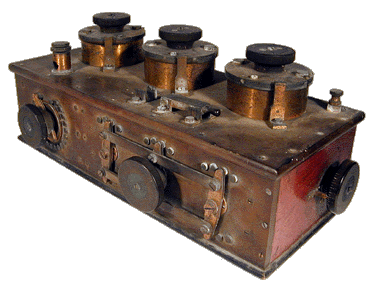
BEFORE |
As you can see in the photo on the left, there was a lot of work to do. While the set was mechanically in good shape (except for a crack in one of the condenser tops), the brass was somewhat pitted and corroded, and the black ebonite components (the knobs, top, front, and condenser tops) had all turned brown with age. In addition all three tuning condensers were frozen as was the large, ganged tuning switch on the front. |
|
I knew this was going to be a very tedious and difficult job, but I was inspired by Jim Kreuzer, probably the world's premier Marconi collector and expert, who had his own tuner restored several years ago. Jim had engaged a master craftsman named Art Albion for the task, and fortunately for me, Art documented the entire process step by step in the June, 1987 issue of Antique Radio Classified! Using Art's article as a guide, I began the systematic and tedious process of disassembly. Most of the screws on the unit were frozen, and all of them used the very thin screwdriver slots typical of early scientific gear. After several days of alternating penetration oil with careful application of pressure through my modified set of screwdrivers I was able to break free all of the screws except one. Amazingly, despite eventual disassembly of the set to it's smallest piece I was never able to get that one screw free! Thankfully, it didn't prevent me from proceeding. |
|
|
AFTER |
Once I had the top open and all of the solder connections removed (that is a story all in itself!) I was able to disassemble the unit. This is where Art's map really helped. Without it I would never have figured out the trick to removing those tuning condensers! All of the brass was soaked in a dilute muriatic acid solution and then cleaned with 0000 steel wool. The parts that needed more work were cleaned with 000 steel wool or emery cloth prior to final polishing. Once the brass was clean and polished it was covered with a thin coat of lacquer. |
|
The tuning condensers are made of zinc plates separated by a dielectric of thin rubber. The zinc had corroded with age which made the unit impossible to turn. Each condenser must have at least 40 of these sets of plates & rubber pads so to clean each one individually would have taken me another 100 years! Instead, I built a jig made of brass rods attached to a wooden base that mimicked the rotating action of the condenser. I slid the plate/pad unit onto the jig and through constant rotating pressure and liberal application of silicon spray was able to free up the condensers again. (Note: apparently freezing condensers was a common problem on the multiple tuner even when it was still in use, according to a 1917 text called " The Maintenance of Wireless Telegraph Apparatus".) Once the brass and condensers were completed I set myself to working on the ebonite panels. I polished them using a small electric hand polisher with automotive rubbing compound on a medium scotch-brite pad. This took quite some time as I had to stop frequently to see if I had rubbed enough to return the black finish but not so much as to remove the panel etching. When the brown was gone, I did one last polish with a fine polishing pad, cleaned and dried the panel, and then applied whiting to the panel markings. I removed the excess whiting with 0000 steel wool, gave it one final polish and was done. There is lots more detail of course, but I won't bore you with it all here. Leave it to say that the unit was reassembled and the result is what you see above! |
|

| Contact |
| Back | Home |